Mold Definitions Interface
What You See
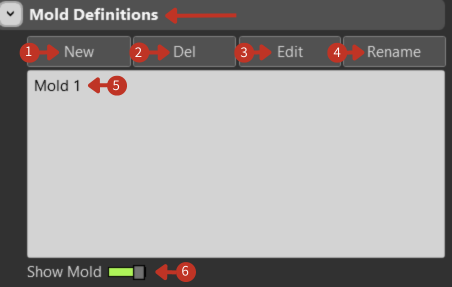
The interface section displays "Mold Definitions" at the top, with action buttons "New," "Del," "Edit," and "Rename" directly below. A list area is present where "Mold 1" is listed. At the bottom, there is a toggle labeled "Show Mold."
Mold Definitions management interface with Show Mold toggle
What It Means
This part of the software interface is designed for managing and interacting with mold definitions used in a manufacturing context.
Action Buttons
-
"New": This button is used to create a new mold definition. Clicking it would likely open a dialog or prompt for importing and defining a new mold.
-
"Del": Short for 'Delete,' this button is for removing the selected mold definition from the system, which in this case would be "Mold 1" if it were selected.
-
"Edit": Allows the user to modify the selected mold definition's parameters, which could include its shape, size, and other characteristics.
-
"Rename": This function enables the user to change the name of the selected mold definition for clarity or organizational updates.
Mold List
"Mold 1": Represents a mold definition that has already been created. It is likely selectable for editing, renaming, or deletion.
Visualization
"Show Mold" Toggle: The green state indicates that the visualization of the selected mold ("Mold 1") is currently enabled, allowing the user to see the mold within the software's display area.
Workflow
- Create new mold definitions or import existing ones
- Configure mold geometry and properties
- Position molds in the workspace
- Attach to external axes if needed
- Use molds as basis for laminate definitions